The QuickBooks Online API provides up to three custom fields for the following transaction types:
- Sales Transactions
- Invoice
- Sales Receipt
- Estimate
- Credit Memo
- Refund Receipt
- Expense Transactions
- Purchase Order
The custom fields could be business-specific fields such as a name, color, or size information. Custom fields are supported in QuickBooks Online Simple Start, Plus, Essentials, and Advanced.
First, you must set up the custom fields in QuickBooks which you can do by following this tutorial if you have not done so already.
Note
Accord retrieves the custom field preferences for a QuickBooks company when it is being connected. If you had a version of Accord installed prior to 1.46 or make changes to the custom fields in QuickBooks like the name, then you will have to reconnect your QuickBooks company.
QuickBooks Online Advanced Considerations/Limitations
Customers can create up to ten custom fields with various data types such as string, date, numeric, lists and the API allows for only three String based fields. You will not be able to retrieve information for the rest of the custom fields at this time. This is done to retain compatibility with all versions of QuickBooks Online.
- The mapping of the first three fields will be Immutable, i.e. even if the first three fields are marked inactive in QuickBooks Advanced, they will still continue to be mapped in the API response.
- If there are not enough String fields created in the QuickBooks Online Advanced (i.e. < 3 String fields), then unassigned fields will not map to any field.
More information about the detailed mapping between the new custom fields can be found here.
Add Custom Fields to Accord
- From the Setup menu navigate to Home > Custom Code > Custom Metadata Types.
- Click Manage Records for QBO Field Master.
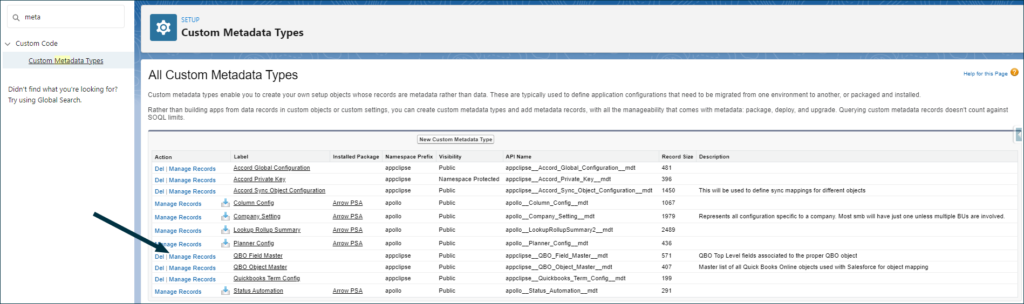
- Click New.
- Enter a Label for the new custom field.
- For the Field API Name, add the prefix “CustomField.” in front of the name of the custom field. Make sure to enter the name of the custom field exactly as it is in QuickBooks.
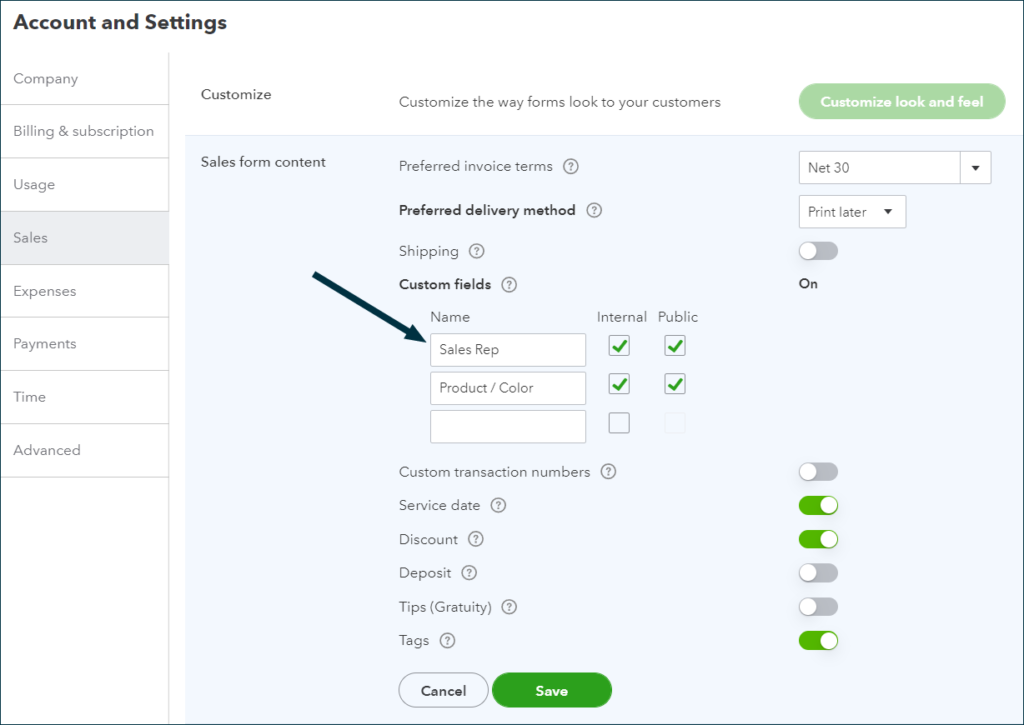
- You can find the name of the custom fields by clicking the Settings icon in QuickBooks, clicking on Account and settings under Your Company, and navigating to either Sales or Expenses section. Copy what is entered there including any spaces/special characters.
- You can find the name of the custom fields by clicking the Settings icon in QuickBooks, clicking on Account and settings under Your Company, and navigating to either Sales or Expenses section. Copy what is entered there including any spaces/special characters.
- Enter a Field Label Name.
- Select the QBO Object Master this field is being added to.
- Leave Relationship To blank.
- Check the Active checkbox.
- Click Save.
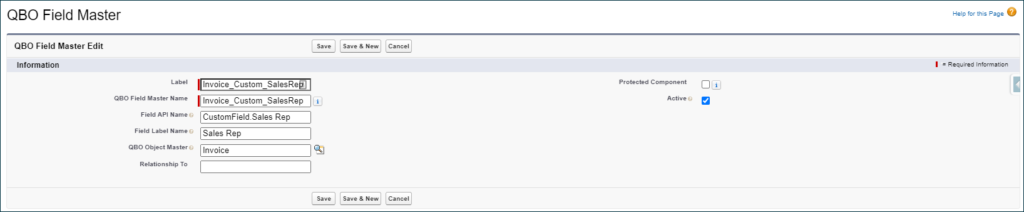
Example
Label: Invoice_Custom_SalesRep
QBO Field Master Name: Invoice_Custom_SalesRep
Field API Name: CustomField.Sales Rep
Field Label Name: Sales Rep
QBO Object Master: Invoice
Relationship To: (Leave Blank)
Active: true (checked)
Repeat the above steps for each custom field that needs to be added for each QuickBooks object.
Now, go to Accord Admin and map the new QBO Custom Fields to Salesforce fields.

Next Steps
Configure Multiple Mapping Configurations for QuickBooks Object (Optional)
Run an Initial Sync


