Prior to setting up the field-level mappings between QuickBooks Online and Salesforce the objects that will be leveraged in Salesforce should be updated to ensure that an External Id field has been configured and the record sync component has been added to the page layout.
Configure Accord QB Id, Accord QB Company Id and Accord Last Sync Fields
For each Salesforce object that integrates with QuickBooks Online the object must have a custom External Id field. As part of Accord Sync a set of External Id fields are pre-installed for Accounts, Opportunities and Products in Salesforce. For any other objects that will be integrated with QuickBooks Online an External Id field must be added to the object.
To create a custom External ID field on any Salesforce object:
- From the Setup menu navigate to Object Manager > [Integrated Object].
- On the Object’s details page click Field & Relationships.
- Click the New button.
- Select Text as the Data Type of the new field and click Next.
- Enter the following details for the new custom field:
Field Label:Accord QB Id
Length:255
Field Name:Accord_QB_Id__c
Required:FALSE
Unique:TRUE
External ID:TRUE
Click Next. - Define the field level security for the new External Id field and click Next.
- Select the page layouts that the new External Id field should be visible on and click Save and New.
- Select Text as the Data Type of the new field and click Next.
- Enter the following details for the new custom field:
Field Label:Accord QB Company Id
Length:255
Field Name:Accord_QB_Company_Id__c
Required:FALSE
Unique:FALSE
External ID:FALSE
Click Next. - Define the field level security for the new field and click Next.
- Select the page layouts that the new External Id field should be visible on and click Save and New.
- Select Date/Time as the Data Type of the new field and click Next.
Field Label:Accord Last Sync
Field Name:Accord_Last_Sync__c
Required:FALSE
Unique:FALSE
External ID:FALSE
Click Next. - Define the field level security for the new field and click Next.
- Select the page layouts that the new field should be visible on and click Save.
CRITICAL
The custom fields that are created must have a Field Name of Accord_QB_Id__c, Accord_QB_Company_Id__c and Accord_Last_Sync__c. If the fields are not named correctly the integration between QuickBooks Online and Salesforce will fail.
Add the Accord Sync Component to Each Object’s Lightning Page
Accord Sync is installed with a lightning component that displays the sync status of a record, and allows you to manually synce the record to QuickBooks from Salesforce or from Salesforce to QuickBooks. The component gives administrative user the ability to manage each individual record on the record’s page.
- From the Setup menu navigate to Object Manager > [Integrated Object].
- On the Object’s details page click Lightning Record Pages and click the name of the lightning record page to open the page editor.
- On the record page add the Accord Record Sync component to the page.
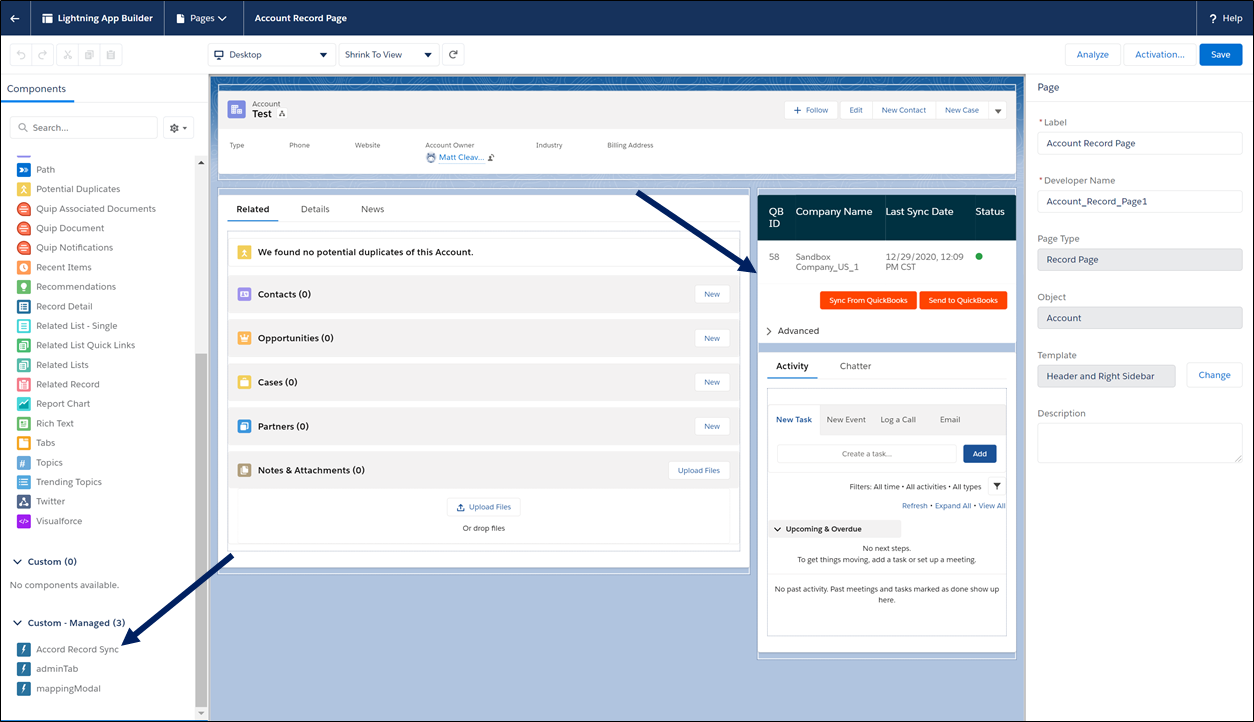
- Click Save, navigate back to the Setup menu, and repeat these steps for each Salesforce object that will be integrated with QuickBooks online.
NOTE
You can leverage Dynamic Lightning Pages to hide / filter the Accord Record Sync component on the lightning page, so only the users that need to see the sync status or manually sync a record have the ability.
Salesforce Help Article: Dynamic Lightning Pages


